What you need:
- A remote control with 6 or more channels (collective, roll, nick, yaw, throttle,flightmode)
- A good ESC with governor mode (keeps the head RPM constant)
- A flybarless helicopter (flybar heads are currently not supported)
Reset all Mixer/Expo/Dual rate/Trim settings. If your remote control allows you to set the number of swashplate servos, choose one servo (Graupner remote control, the Taranis is already pre setup in the right way). All the servo mixing is done by the FC (your flight controller), not by your transmitter. Consult the documentation of your transmitter. This documentation describes the setup of a Trex 450. Check the FC firmware and update if needed.
Also check your helicopter for:
- vibration free setup
- correct linkages lenght and angles
- smooth moving pushrods
- secured screw
- correct adjusted belt tension (if applicable)
- safe attached FC
- unsecured cables
Safety warning:
Remove the blades before you begin. A rotating helicopter may cause serious injuries.
Input cabling (example, change if it doesnt match your setup):
| Channel remote control | Used as | Input Channel FC |
|---|---|---|
| 1 | Collective | 1 |
| 2 | Roll | 2 |
| 3 | Nick | 3 |
| 4 | Yaw | 4 |
| 5 | Flight mode | 5 |
| 6 | Throttle | 6 |
Output cabling:
| Servo | Position on swashplate (from above) | Output in FC |
|---|---|---|
| Swashplate 1 | rear | 1 |
| Swashplate 2 | left | 2 |
| Swashplate 3 | right | 3 |
| Tail | - | 4 |
| ESC | - | 5 |
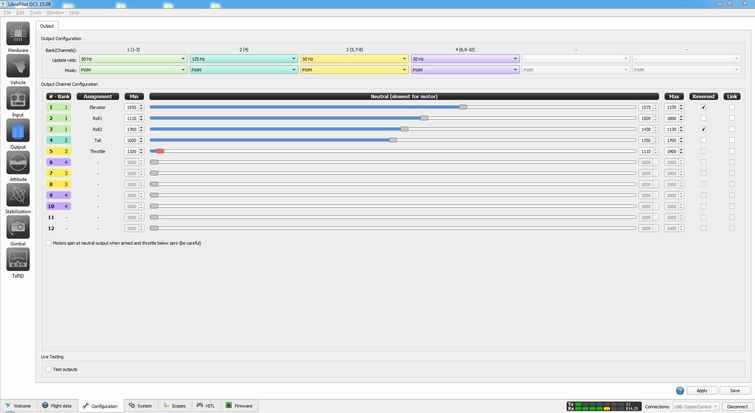
Set the the correct swashplate type (for this helicopter we use 3 servos and 120 degree angle) and define the output channels. Define the position of the first servo (rear one). The setup shall match the the output cabling according to the output cabling table
.
 μ
μ
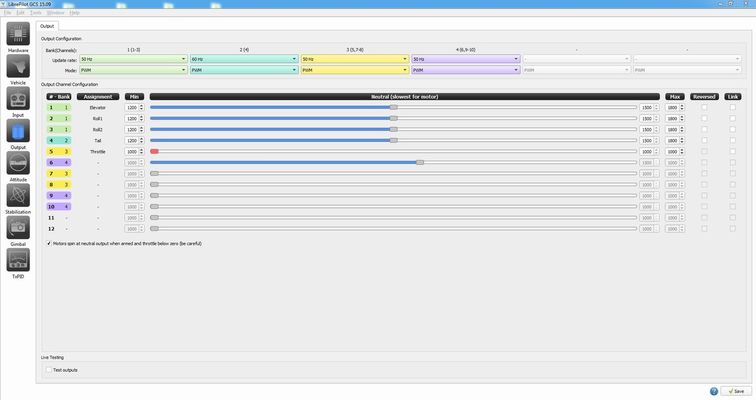
Swashplate leveling:
Here you can adjust swashplate. Before you begin center your servos and mount the servo horns as near to the neutral position as possible. It cant be done perfectl at the first step but it will be fine tuned during the swashplate level procedure. To avoid mechanical collisions between the frame and the chassis. remove the pushrods from the servos. On the output screen set all servos to neutral=1500 μs minimum to 1200μs and maximum to 1800μs. Thats a reduced servo movement range but at the moment fine as start values. It shall look like this:
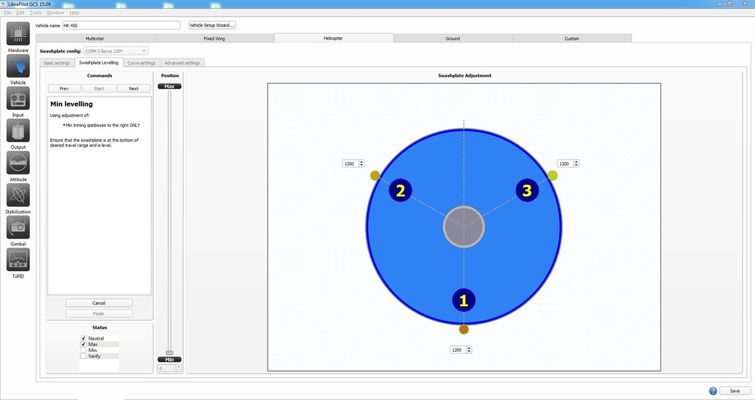
Now start the swashplate level wizard by pressing on start. The neutral position on the swashplate will be set, adjust the the check boxes on the servos positions to set all servo horns to horizontal position. Press next to set the the maximum position of the swasplate and watch the servos. Is one of the servos moves to the wrong direction, cancel the wizard and reverse the servo direction on the output screen and restart the wizard.

Check also the lower position
Verify the servo travel.
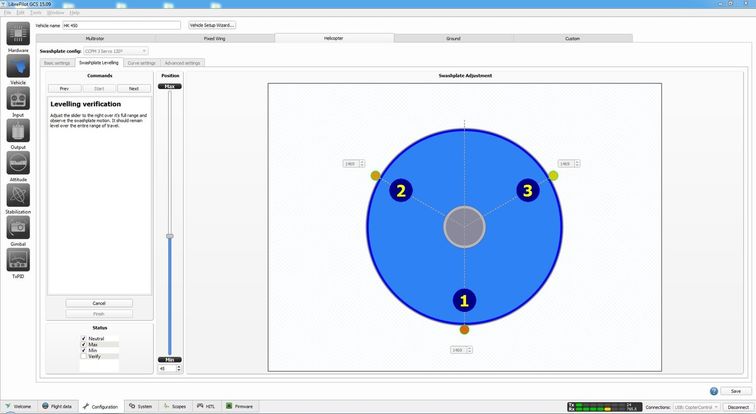
After verifying that all servos are moving correct reconnect the linkages to the servo horns and restart the wizard. The neutral position of the servos horns is already set, so adjust the linkages to level the swashplate. Verify also the maximum position (+15°) and minimum position (-15°). Dont forget to level the swashplate at the maximum and minimum position. Use only the slider to change the values, if you enter the position directly and with values out of the servo move range you can easy destroy your swashplate servos. After setting up the swashplate your output screen may look litke this: